Configure the Scout Cam Box To Record Video
Recording Video with Your Camera
Figuring out what settings to use for a given camera is often not a trivial exercise. How long before my camera is ready after it comes out of sleep? How many pulses do I send the camera to start and stop video recording? Where do I set the video clip length? This page answers all of these questions with a visual of what your camera box settings should look like for a given camera. We also point out the gotcha settings for each camera. All of the settings that need to be changed from default are circled in red. This page assumes you have a general familiarity with the Scout System and its settings. Only the camera specific settings will be addressed here.
Not all cameras can be used to record video, for this to work the camera needs to have the capability to record video via the remote shutter port on the camera. This is the port the Scout Camera Box is connected to and the interface used to start and stop the video. If your camera has this capability and you don't see it listed it is very likely the settings are very similar to a camera here of the same make. Most Canon's that have this capability use the same settings as the 5DmkIV listed. Same goes for Nikon and Sony.
Cable and Camera Settings
For the Canon R5 MkII you will use the Canon N-3 shutter interface cable to connect the camera to the Scout Camera Box.
The camera then needs to be configured so that pushing the shutter button starts and stops the video recording. Follow these steps to make these changes:
Switch to Movie Mode:
1. Turn the camera on and set the Still/Movie switch to the Movie icon.
2. Press the MENU button.
3. Navigate to Shutter Settings: Go to the [Shooting 6] tab (red camera icon tab 6) and select [Shutter btn function for movies].
4. Configure Full-Press: Select [Fully-press] and set it to [Start/stop mov rec].
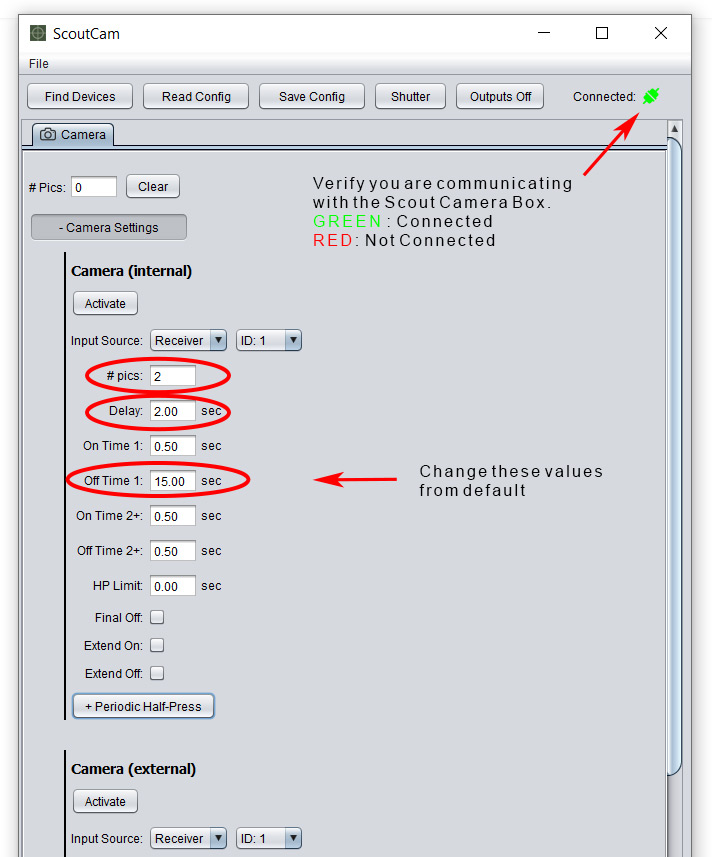
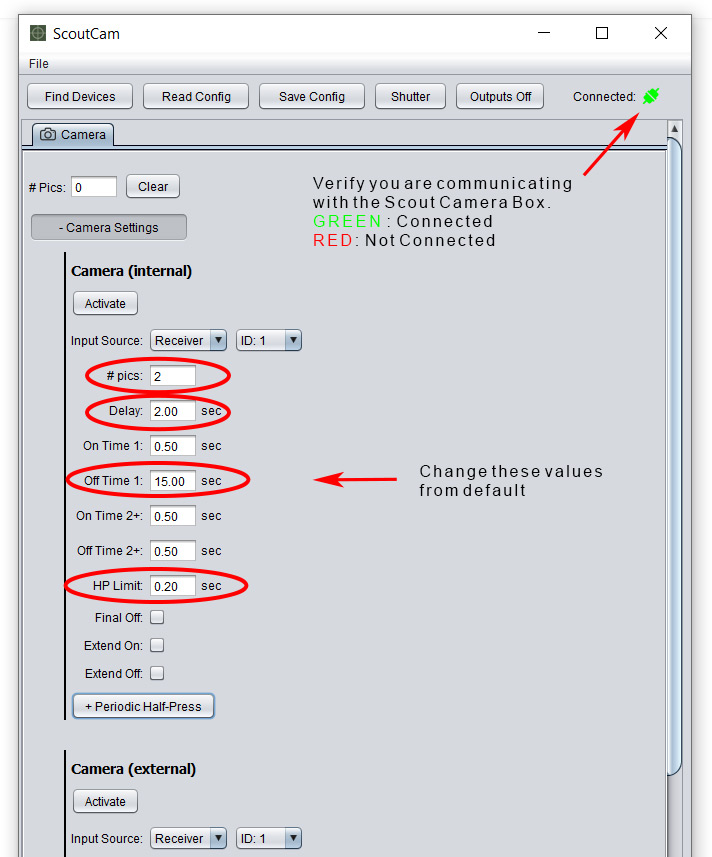
Scout Camera Box Settings
We are using the remote shutter port to control the camera. Often this port is used to control the camera with a hand held remote button that has both full and half press on it. It is helpful to think of the parameters below as a time line of electronic button presses the Scout Camera Box Controller will send the camera to get the behavior we want - in this case record a video of 15 seconds. All of the parameters below will allow us to define these electronic button presses.
# pics: You can think of # pics like the number of button presses. In the case of the Canon camera we want one button press to start the video and one to stop it. Two button presses means #pics should be set to 2.
Delay: Delay adds time between when the half press and full press signals are sent to the camera. As soon as the sensor detects a subject it will send a signal to the camera box which will then assert the half press immediately, it will then wait the Delay time and then assert the full press which will start the video. This camera requires a Delay of at least 2 seconds - without it the camera can get out of sync and you will end up with a 30 min video clip.
Om Time 1: If we continue with our analogy of configuring the electronic button presses to make the camera do what we want. The On Time 1 is the length of time the button is held down for the first press. For Canon, 0.5 seconds is long enough to register a button press. This button press (pulse) starts the video.
Off Time 1: Off Time 1 is the delay between our two button presses and also sets the length of the video clip you want to record.
Om Time 2: This defines how long our second button press is held down - again for Canon 0.5 seconds is long enough to register a button press. This button press stops the video record.
Extend Off: If you want additional triggers that come in from the sensors to extend the length of the video clip check this box. Each time an additional trigger comes in it will restart the Off Time 1 timer. For example if you are recording a 10 second video and you get a second trigger 5 seconds into your video the video clip length will be extended to a total of 15 seconds.
HP Limit When shooting video with this camera you can’t give them a long half-press right away or else it will bring up a “'Push the Start/Stop button to activate Movie Shooting” screen. The camera needs a quick half-press, but also a little more time to boot up. So this parameter was introduced to resolve that issue.
Cable and Camera Settings
For the Canon 5D MkIV you will use the Canon N-3 shutter interface cable to connect the camera to the Scout Camera Box.
The camera then needs to be switched into video mode so a shutter button press will record video instead of taking a still image. This is the default button assignment in video mode but if you do need to change it you can find it in the SHOOT5 menu. Find this by navigating to page 5 of the red menu in the Camera Settings and finding the "Btn Function" option. Set "Btn Function" to one of the two modes that will record a movie on a full button press. See the cameras owner's manual (Menu Function Settings) for more details. The 5D Mk IV is the first Canon DSLR to have this capability.
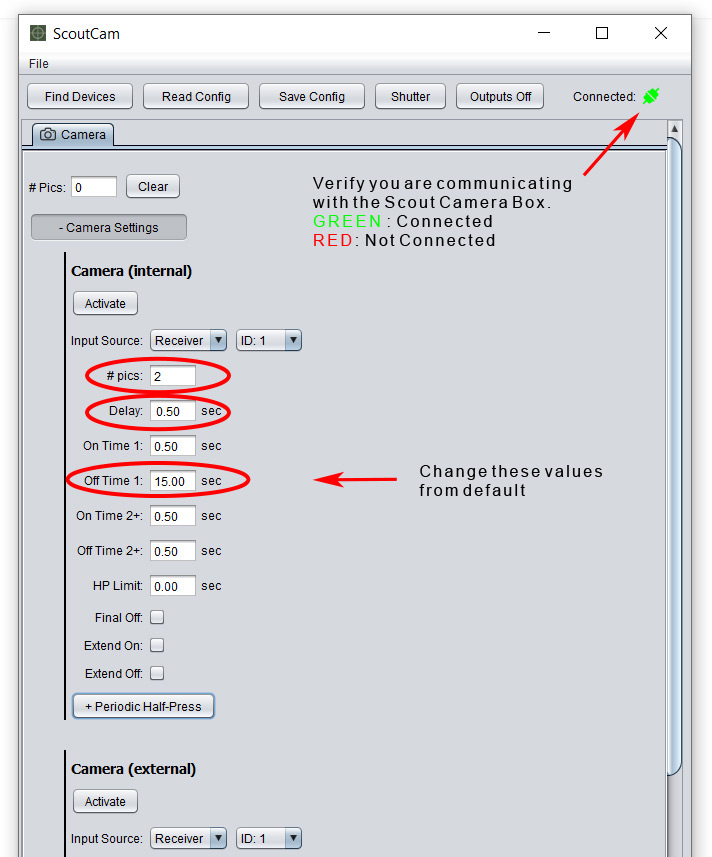
Scout Camera Box Settings
We are using the remote shutter port to control the camera. Often this port is used to control the camera with a hand held remote button that has both full and half press on it. It is helpful to think of the parameters below as a time line of electronic button presses the Scout Camera Box Controller will send the camera to get the behavior we want - in this case record a video of 10 seconds. All of the parameters below will allow us to define these electronic button presses.
# pics: You can think of # pics like the number of button presses. In the case of the Canon camera we want one button press to start the video and one to stop it. Two button presses means #pics should be set to 2.
Delay: Delay adds time between when the half press and full press signals are sent to the camera. As soon as the sensor detects a subject it will send a signal to the camera box which will then assert the half press immediately, it will then wait the Delay time and then assert the full press which will start the video. This camera requires a Delay of at least 2 seconds - without it the camera can get out of sync and you will end up with a 30 min video clip.
Om Time 1: If we continue with our analogy of configuring the electronic button presses to make the camera do what we want. The On Time 1 is the length of time the button is held down for the first press. For Canon, 0.5 seconds is long enough to register a button press. This button press (pulse) starts the video.
Off Time 1: Off Time 1 is the delay between our two button presses and also sets the length of the video clip you want to record.
Om Time 2: This defines how long our second button press is held down - again for Canon 0.5 seconds is long enough to register a button press. This button press stops the video record.
Extend Off: If you want additional triggers that come in from the sensors to extend the length of the video clip check this box. Each time an additional trigger comes in it will restart the Off Time 1 timer. For example if you are recording a 10 second video and you get a second trigger 5 seconds into your video the video clip length will be extended to a total of 15 seconds.
HP Limit When shooting video with this camera you can’t give them a long half-press right away or else it will bring up a “'Push the Start/Stop button to activate Movie Shooting” screen. The camera needs a quick half-press, but also a little more time to boot up. So this parameter was introduced to resolve that issue.
Cable and Camera Settings
For the Nikon Z5 you will use the Nikon MC-DC2 shutter interface cable to connect the camera to the Scout Camera Box.
The camera then needs to be configured so a shutter button press will record video instead of taking a still image. To do this go to: Menu -> Custom Settings -> g – Movie -> Custom Controls -> Change the shutter button assignment from picture to movie.
Scout Camera Box Settings
We are using the remote shutter port to control the camera. Often this port is used to control the camera with a hand held remote button that has both full and half press on it. It is helpful to think of the parameters below as a time line of electronic button presses the Scout Camera Box Controller will send the camera to get the behavior we want - in this case record a video of 10 seconds. All of the parameters below will allow us to define these electronic button presses.
# pics: You can think of # pics like the number of button presses. In the case of the Nikon camera we want one button press to start the video and one to stop it. Two button presses means #pics should be set to 2.
Delay: Delay adds time between when the half press and full press signals are sent to the camera. As soon as the sensor detects a subject it will send a signal to the camera box which will then assert the half press immediately, it will then wait the Delay time and then assert the full press which will start the video. This camera requires a Delay of at least 0.5 seconds - this short delay will give the camera a bit of extra time to wake up from sleep mode.
Om Time 1: If we continue with our analogy of configuring the electronic button presses to make the camera do what we want. The On Time 1 is the length of time the button is held down for the first press. For Nikon, 0.5 seconds is long enough to register a button press. This button press (pulse) starts the video.
Off Time 1: Off Time 1 is the delay between our two button presses and also sets the length of the video clip you want to record.
Om Time 2: This defines how long our second button press is held down - again for Nikon 0.5 seconds is long enough to register a button press. This button press stops the video record.
Extend Off: If you want additional triggers that come in from the sensors to extend the length of the video clip check this box. Each time an additional trigger comes in it will restart the Off Time 1 timer. For example if you are recording a 10 second video and you get a second trigger 5 seconds into your video the video clip length will be extended to a total of 15 seconds.
Cable and Camera Settings
For the Sony A7SII you will use the Sony Video Switch as the shutter interface cable to connect the camera to the Scout Camera Box.
The Sony A7SII cannot be used to record video with out the Video Switch. Sony uses a proprietary USB command to toggle the state of video recording for this camera. The Sony Video Switch takes the input of the Scout Camera Box and translates it into the appropriate USB commands for the Sony cameras. The only change that needs to be made to the camera configuration is to set the "Pwr Save Start Time" 10 seconds. Making this change shortens the amount of time the camera will be awake after a video is recorded to the shortest setting. This setting is in the SETUP menu.
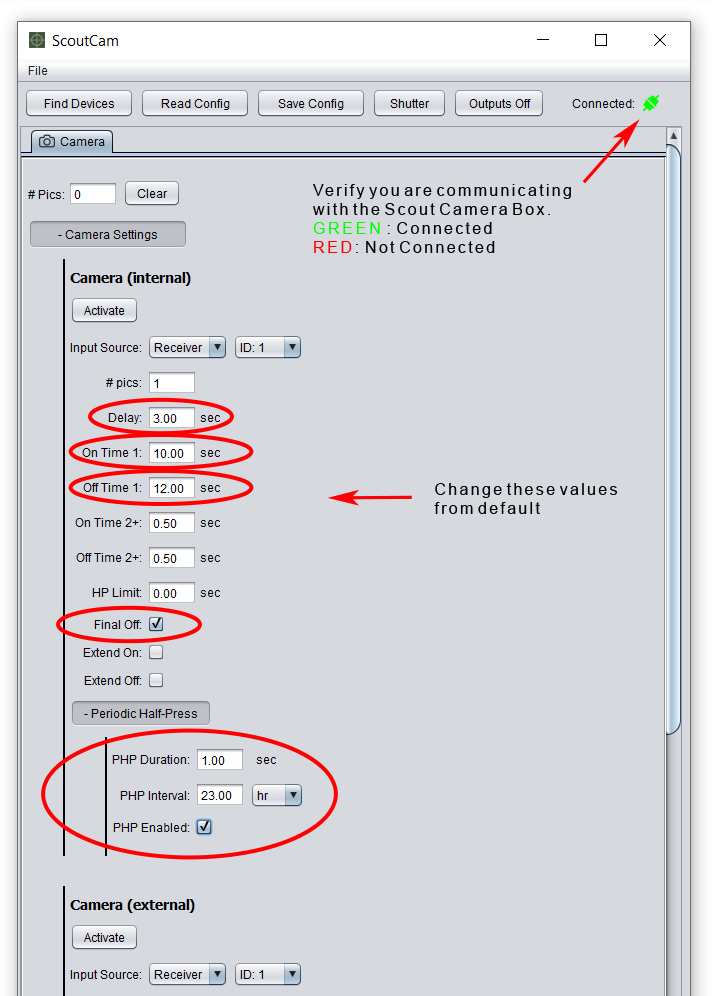
Scout Camera Box Settings
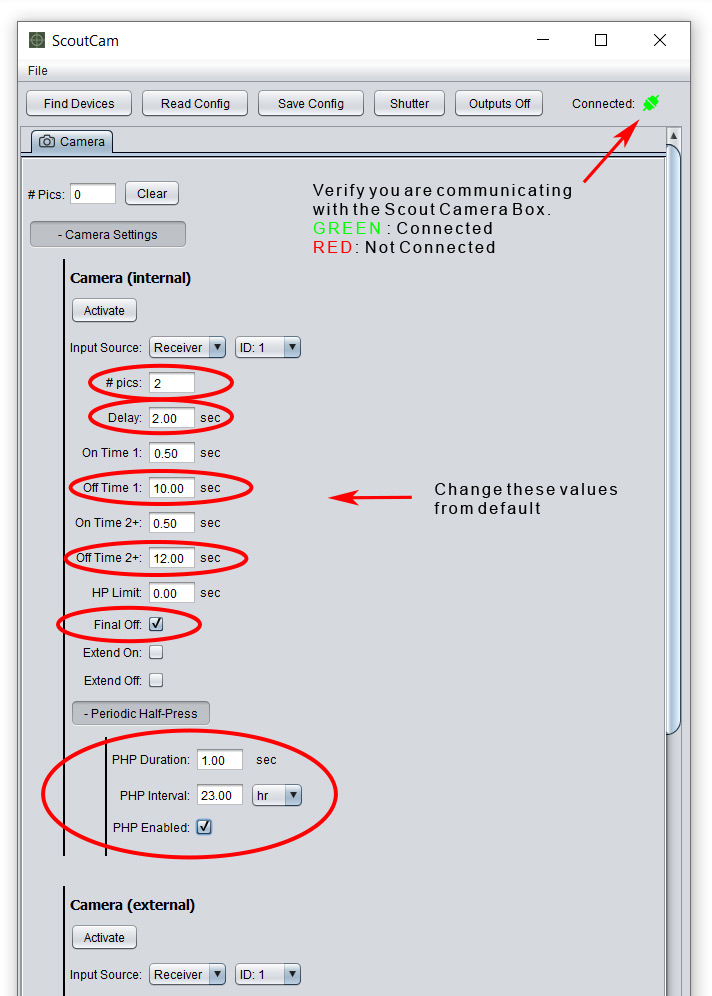
For this camera we will send one long record pulse - the length of the pulse is the record time of the video - see settings below for details
# pics: Set this to one to create a single long pulse the length of the video clip you want to record.
Delay: Delay adds time between when the half press and full press signals are sent to the camera. As soon as the sensor detects a subject it will send a signal to the camera box which will then assert the half press immediately, it will then wait the Delay time and then assert the full press which will start the video. The Sony A7SII takes a bit of time to wake-up and get ready for recording. Set this to 3 seconds. If this is too short the camera and camera controller can get out of sync. In they get out of sync the camera will interpret what should be a stop pulse as a start pulse. This will leave you with a 30 minute video clip with no action.
Om Time 1: This should be set to the length of the video clip you want to record. In our example 10 seconds.
Off Time 1: We need to give the Sony camera time to finish up the write process and go back to sleep so we can start the next clip from a known state. We need to make certain no triggers are sent to the camera during this time. To do that we need an Off Time 1 set to 12 seconds.
Final Off Check this box to use the Off Time above even though there is only one pulse. Without this box checked the Camera Box will allow a trigger to come in during Off Time 1.
PHP Duration: The Sony has two sleep modes, it enters the first after a short period (controlled by the camera settings) and the second after 48 hours of no activity. If the camera is allowed to enter this deeper sleep mode it takes much longer to wake up causing the camera and Scout Camera Controller to get out of sync. We need to prevent the camera from going into this deeper sleep by waking it up occasionally with a half press. PHP Duration is how long the half press is held down - 1 second will be plenty long to wake up the camera.
PHP Interval: This is how often the Scout Camera Box will send the 1/2 press signal to wake the camera - we use 23 hours to make certain we don't allow the camera to enter the 48 hour sleep mode.
Cable and Camera Settings
For the Sony A7SIII you can use the Sony Video Switch as the shutter interface cable to connect the camera to the Scout Camera Box. When using this cable the camera box settings are identical to the A7SII with the exception of the Delay - for the A7SIII the delay can be 2 seconds instead of 3. A delay of 2 seconds includes some safety margin as we have tested durations as short as 1.25 seconds that were successful. All of the other settings shown for the A7SII can be the same as the A7SIII.
When shooting video with the A7SIII you can also use the Sony VPR-1 Shutter Cable. When using this cable the camera must be in video mode and the "REC w/ Shutter" must be set in the setup tab of the camera settings. This camera will not record video in Manual mode or Aperture Priority Mode when using this cable, for this you must use the Sony Video Switch. The settings shown to the left are used when the standard shutter cable is used as the interface.
Scout Camera Box Settings
We are using the remote shutter port to control the camera. Often this port on the camera is used to control the camera with a hand held remote that has both a full and half press on it. It is helpful to think of the parameters below a time line of electronic button presses the Scout Camera Box Controller will send the camera to get the behavior we want - in this case record a video of 10 seconds. All of the parameters below will allow us to define these electronic button presses.
# pics: You can think of # pics like the number of button presses. In the case of the A7SIII we want one button press to start the video and one to stop it. Two button presses means #pics should be set to 2.
Delay: Delay adds time between when the half press and full press signals are sent to the camera. As soon as the sensor detects a subject it will send a signal to the camera box which will then assert the half press immediately, it will then wait the Delay time and then assert the full press which will start the video. This camera requires a Delay of at least 2 seconds - without it the camera can get out of sync and you will end up with a 30 min video clip.
Om Time 1: If we continue with our analogy of configuring the electronic button presses to make the camera do what we want. The On Time 1 is the length of time the button is held down for the first press. For the A7SIII, 0.5 seconds is long enough to register a button press. This button press (pulse) starts the video.
Off Time 1: Off Time 1 is the delay between our two button presses and also sets the length of the video clip you want to record, in our example 10 seconds.
Om Time 2: This defines how long our second button press is held down - again, 0.5 seconds is long enough to register a button press. This button press stops the video record.
Extend Off: If you want additional triggers that come in from the sensors to extend the length of the video clip check this box. Each time an additional trigger comes in it will restart the Off Time 1 timer. For example if you are recording a 10 second video and you get a second trigger 5 seconds into your video the video clip length will be extended to a total of 15 seconds.
PHP Duration: The Sony has two sleep modes, it enters the first after a short period (controlled by the camera settings) and the second after 48 hours of no activity. If the camera is allowed to enter this deeper sleep mode it takes much longer to wake up causing the camera and Scout Camera Controller to get out of sync. We need to prevent the camera from going into this deeper sleep by waking it up occasionally with a half press. PHP Duration is how long the half press is held down - 1 second will be plenty long to wake up the camera.
PHP Interval: This is how often the Scout Camera Box will send the 1/2 press signal to wake the camera - we use 23 hours to make certain we don't allow the camera to enter the 48 hour sleep mode.
As low as $589.00
As low as $499.00
As low as $439.00